Showing posts with label cooking. Show all posts

Saturday, December 17, 2011

Cheesiest Homemade Macaroni & Cheese


Last week my grandma was visiting.  Before she headed to the airport to return back to Washington, I wanted to make her a yummy, filling meal to stick to her bones for the flight home.  I had visions of her plane getting stuck on a runway with no extra food in her bag.  So I made sure she had good food in her tummy.  

Like most grandmas, she loves home-cooked comfort food.  I knew she'd love this super cheesy macaroni and cheese.  

This is another great recipe from Martha Stewart.  Martha likes expensive cheese so beware when shopping for her recommendations in the gourmet cheese aisle.  I bought a Trader Joe's New Zealand sharp white cheddar and a white cheddar Gruyere combination cheese.  You can experiment with the cheese varieties to stick within a budget.  The only thing I'd recommend it to use real cheese, no artificial cheeses.  They just don't melt well, and they're artificial.  Go for the REAL stuff!

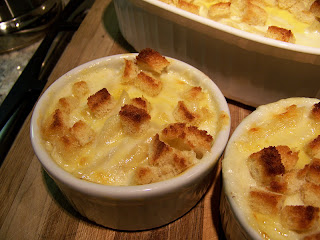
Also, if you have small baking dishes, serve up individual macaroni and cheese meals.  I think they're adorable!


Ingredients
Serves 12

8 tablespoons (1 stick) unsalted butter (you'll use 2 T. for the bread and then 6 T. for the cheese sauce)
6 slices {good} white bread, crusts removed, torn into 1/4-1/2 inch pieces

5 1/2 cups milk
1/2 cup all-purpose flour
2 teaspoons salt
1/4 teaspoon ground nutmeg
1/4 teaspoon ground black pepper
1/4 teaspoon cayenne pepper, optional (I usually leave it out because some of our kids don't like spicy)
4 1/2 cups grated sharp white cheddar cheese
2 cups grated Gruyere cheese or 1 1/4 cups grated Pecorino Romano cheese

1 pound elbow macaroni, or a similar shaped noodle

Directions

1.  Heat oven to 375 degrees.  Butter or spray a 3-quart casserole dish; set aside.  Place small bread pieces in a medium bowl.  Melt 2 tablespoons butter in microwave safe dish.  Pour over bread and toss.  Set aside.

2.  In a medium saucepan set over medium heat, heat milk.  Melt remaining 6 tablespoons butter in large pot.  When butter bubbles, add flour.  Whisk one minute.

3.  While whisking, SLOWLY pour in hot milk.  Don't pour all milk in at one time or you'll have lumpy cheesy sauce.  Not good!  Continue cooking, until mixture bubbles and thickens.  This can take a few minutes.  Be patient.

4.  Remove pan from heat.  Stir in seasonings, 3 cups of the cheddar cheese, and 1 1/2 cups of the Gruyere.  Set aside.

5.  Meanwhile, prepare noodles according to package.  Drain, rinse with cold water.  Drain well.  Stir macaroni into cheese sauce.

6.  Pour mixture into prepared 3-quart dish, or small greased individual baking dishes.  Sprinkle with remaining cheese and breadcrumbs.  Bake until browned on top, 20  minutes or so.  Allow to cool 5 minutes before serving.


Wednesday, November 23, 2011

Mini Sweet Potato Streusel Tarts


A number of years ago I came across this recipe from Cooking Light.  I don't care for pumpkin pie, but this little treat is my pumpkin pie substitute.  These little tarts are bite size so if you're watching portions, enjoy one and then call it quits.  They are a bit time consuming to prepare, but I think they're definitely worth the effort. It's best if you have a mini-muffin pan to make them in.  I also have a wooden tart tamper/ mini-tart shaper.  Mine was from Pampered Chef, but I saw them online for about $4.  Since I only make them once a year for Thanksgiving, the time spent making them is actually relaxing and they're so adorable I can barely stand it!

Sweet Potato Streusel Tarts
from Cooking Light

Crust:
1 cup all-purpose flour
2 tablespoons granulated sugar
1/8 teaspoon salt
2 tablespoons chilled butter, cut into small pieces
2 tablespoons vegetable shortening (I don't use the vegetable shortening.  I end up just using 4 tablespoons butter)
3 tablespoons ice water
Cooking Spray

Filling:
1/4 cup maple syrup
2 tablespoons brown sugar
3/4 teaspoon ground cinnamon
1/2 teaspoon ground allspice
1/4 teaspoon salt
1 large egg
1 cup mashed cooked sweet potatoes
1/4 cup evaporated milk

Streusel:
2 tablespoons finely chopped pecans (or other nut)
2 tablespoons brown sugar
1 1/2 teaspoons chilled butter, cut into small pieces

Before beginning, prepare sweet potatoes.  Peel, cube, and boil sweet potato until softened.

Peel, cube, cover sweet potato with water and boil until softened.

Done; ready to mash

Ready for filling
Crust
To prepare crust, lightly spoon flour into a dry measuring cup, and level with a knife.  Place the flour, granulated sugar, and 1/8 teaspoon salt in food processor; pulse 2 times or until combined.  Add 2 tablespoons butter and shortening, and pulse 4 times or until mixture resembles coarse meal.  With processor on, add ice water through food chute, 1 tablespoon at a time, processing just until combined (Do not let it form a ball).  Shape mixture into a 6-inch log; wrap in plastic wrap coated with cooking spray.  Freeze 30 minutes.

The worker

Pulsed

Add chilled butter

Workers


Resembling coarse meal

After chilling, shape the dough into 24 balls, and place 1 ball in each of 24 miniature muffin cups coated with cooking spray.  Press dough into the bottoms and up the sides of the muffin/tart cups.

I have these handy gadgets for these little tarts.  They make this project so easy!

Ready for filling

Preheat oven to 425 degrees.

Filling
To prepare the filling, place syrup and next 5 ingredients (syrup through egg) in a bowl;  beat with a mixer at medium speed for 1 minute or until well blended.  Add sweet potatoes and milk;  beat until well blended.  Spoon about 4 teaspoons filling into each muffin cup.


Streusel
To prepare streusel, combine nuts and 2 tablespoons brown sugar in a small bowl; cut in 1 1/2 teaspoons butter with a pastry blender or 2 knives until mixture resembles coarse meal.  Sprinkle streusel evenly over tarts;  bake at 425 degrees for 10 minutes.  Reduce heat to 350 degrees and cook an additional 12 minutes or until filling is set.  Cool for 5 minutes on a wire rack.  Run a knife around outside edges.  Remove tarts, and cool completely on wire rack.


Fresh out of the oven

Ready to serve

Try to just have one!

Monday, September 26, 2011

Homemade Beef Broth & Vietnamese Beef Noodle Soup: Pho

Beef Noodle Soup- Pho

I've gone a little crazy for Vietnamese and Thai food in the last couple weeks.  The cravings started when my mom was visiting and wanted to take us out for Vietnamese.  The kids had pho and my mom and I had noodle salad.  The flavors of mint, Thai basil, cilantro and rice noodles continued to linger on my mind long after the lunch. Fortunately, we are blessed with a family of adventurous eaters so they'd welcome an Asian cooking spree.

After that lunch outing, I went home and chose a couple recipes from one of my favorite Thai cookbooks and a Pho recipe from another favorite cookbook, wrote up a shopping list and headed to our local Vietnamese/Asian grocery.

Shopping in an Asian grocery store can be a bit intimidating, but it can also be a great learning experience.  When you're on the search for food you've never heard of packaged with labels you can't read, it can get a bit frustrating and overwhelming, but be open to asking questions.  I've learned so much asking fellow shoppers or grocery employees questions.  There was one Asian grocery I frequented and every time I went to check out the sweet employee would ask me what I was making.  She'd then look at my basket and remind me of ingredients I was missing.  Love that help.  I've also learned so much by asking Vietnamese friends how to prepare their favorites.  They offer me tips I haven't found in books- tips that actually work!  I'm always searching for a cultural education in food preparation.

The first menu item on my list was Vietnamese Beef Noodle Soup, also known as Pho, pronounced "fuh."

Beef Noodle Soup
(Recipe from Extending the Table...A World Community Cookbook)

Combine in a large saucepan:
3 quarts water
1/2-1 1/2 pounds beef or beef soup bones
2-4 beef bouillon cubes
1 onion, cut in half
1 teaspoon salt


Beef Soup Bones


Huge pot ready for soup. 

I double most recipes to have extras for lunches in the week.
Cover and simmer 2-3 hours until broth is flavorful.  Skim residue so broth is as clear as possible.  I skim the broth a few times and then finally strain it to ensure it is as clear as possible.

Skimming off the residue...this is the residue.

Broth cooking


I will often strain the broth to get it as clear as possible.

The broth is ready for next step.
The soup bones and onion are removed from the broth.  These look great for a dog.  Too bad we don't have one.
1 hour before serving the soup, add:

4 whole anise stars

Continue to simmer.


Anise stars- beautiful!
 While broth is simmering, prepare separate bowls with the following:

Cilantro, chopped
Thai basil (Thai basil is different from regular basil.  It has a purplish stem).
Green onion, thinly sliced
Beef tenderloin, thinly sliced (Our Asian market will slice beef thinly.  If you don't have this luxury, partially freeze beef and then slice)
Tripe, optional.  Many people don't like tripe, but I was raised on it, so we add it.  My hub doesn't like it, so he doesn't add it to his soup.  Boil the tripe to cook.
Thin rice noodles  I buy fresh or semi-fresh noodles, but if you purchase dry noodles, place noodles in a saucepan of boiling water and cook until soft, about 3 minutes.  Do not overcook- they will start to fall apart.  Rinse in cold water and drain thoroughly in strainer.


Tripe cooking- If it's not your thing, don't add it.

This is a very large bag of rice noodles.  I'll also make Pad Thai with it.
Just before serving add:
1 tablespoon sugar
2-3 tablespoons fish sauce
salt to taste

Broth should be a bit saltier than you might normally prefer, because rice noodles are bland.  To serve, place portions of rice noodles, cilantro-onion-herb mixture, and raw beef  slices in large soup bowls.  Cover with very hot broth.  The hot broth will cook the meat in the bowls.

Have another plate of bean sprouts, mint leaves, hot chili pepper slices, and lemon/lime slices for people to add as desired.  We also serve with Hoisin Sauce and Sriracha Hot Sauce.


The beef purchased at the Asian store is VERY thin, so it cooks in the broth.  If your meat is thicker, you can add it to the broth and allow to cook prior to placing in bowl.

Beef, Tripe & Noodle

Covered with broth and herbs


So good!  Enjoy!

Sunday, April 03, 2011

Bright Ideas for Dishes

As you may or may not know I'm moonlight as an ebay seller.  It's not that I have tons of time, but I have a desire to field trip and buy something new every once in awhile and found this is one way to earn a couple extra dollars.  Tonight as I was perusing Pioneer Woman's website checking out the recipe and photos of her brother's tacos, I noticed the plate holding the tacos.  Hey, I think I have that dish in my stacks of plates.  Could it be Terra Cotta Rope by Target Home?  (I'm getting pretty good at pattern identification).  Maybe if I had some creativity, I could borrow a decorative plate from my collection, and photograph food on plates that would coordinate with the food.  But that would take a lot of time.  I'd have to wash the plate, set up the food, and then hope for good lighting.  I'm terrible at finding the right lighting.  Now I'm wondering where does Pioneer Woman store all these plates for her wonderful photographs?  Who's schooling her kids while she's taking all these great shots?  Who's cleaning up the messes so the dirty dishes aren't stacked up in the background?  Being that creative must be exhausting?  Or, she must have a TON of space and a lot of help.  Hmmm...maybe she'll one day buy just the right dish to display the latest and greatest enchilada recipe.  So far, I don't think I've ever shipped anything to Oklahoma.  Maybe next month.

Friday, April 01, 2011

Civil War Study- Johnnycakes

This year we've been focusing our history studies on The Civil War.  Last year we studied The Discovery of America, the Colonial Period and the Revolutionary War so next on the list of major American events was the Civil War.  Sometimes I feel the pressure to reinvent the homeschool wheel of unit studies, but have found many great resources online and at our local library.  I'm consistently looking for ideas to incorporate into our schooling making it not only educational, but fun and interesting.  In all too many classrooms, history is presented in a way that is forgettable, uneventful and just plain boring.  On the contrary, history is amazingly interesting and so applicable to our lives today.

One resource I found for beginning a Civil War study is from Our Homeschooling Expedition .  I don't incorporate or do every activity listed, but glean what would help us out or supplement our current study. 

Yesterday we made Johnnycakes.  We found the recipe in Exploring History through Simple Recipes Civil War Cooking The Union by Susan Dosier.  We found the book at our local library.  Apparently, people in the New World have eaten Johnnycakes since the 1600's.  They are very popular in the Northeastern United States.  We revised the recipe a bit.  Here's what we did.

To make Johnnycakes you need:

1 cup boiling water
1 1/2 cups ground yellow cornmeal (we used Bob's Red Mill)
1/2 teaspoon salt
1 1/2 tablespoons sugar, optional
1/2-1 cup milk
2 Tablespoons butter, for griddle
molasses or syrup and butter for serving

1.  Bring water to boil in the saucepan.  Pour water over cornmeal
2.  Add salt, sugar, and 1/2 cup milk in bowl.  Stir well.  Continue to add additional milk and additional water if necessary until batter has consistency thicker than normal pancake batter, but can be spread in pan to make cakes.
3.  Melt 2 tablespoons butter in skillet or you can use a griddle.  Cook over medium heat 4-5 minutes on each side.  Cook until edges are lightly browned.  Turn gently with spatula.
4.  We served sprinkled with cinnamon and sugar, but the book recommends molasses, or syrup.  Enjoy!


When I made the recipe as directed the batter seemed very thick like this.  I think you need to thin it out with more water or milk to receive the desired consistency.


I LOVE this cast iron pan.  A necessity for every kitchen.  Make sure you buy the one made in USA.  The others are no good.

Yummy Johnnycakes.  Ours were thicker than those pictured in the book.  Very good!  And filling!

They turn out great on a griddle too!  Enjoy!