Saturday, December 17, 2011

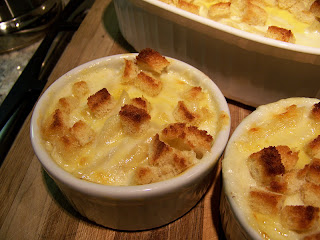
Cheesiest Homemade Macaroni & Cheese


Last week my grandma was visiting.  Before she headed to the airport to return back to Washington, I wanted to make her a yummy, filling meal to stick to her bones for the flight home.  I had visions of her plane getting stuck on a runway with no extra food in her bag.  So I made sure she had good food in her tummy.  

Like most grandmas, she loves home-cooked comfort food.  I knew she'd love this super cheesy macaroni and cheese.  

This is another great recipe from Martha Stewart.  Martha likes expensive cheese so beware when shopping for her recommendations in the gourmet cheese aisle.  I bought a Trader Joe's New Zealand sharp white cheddar and a white cheddar Gruyere combination cheese.  You can experiment with the cheese varieties to stick within a budget.  The only thing I'd recommend it to use real cheese, no artificial cheeses.  They just don't melt well, and they're artificial.  Go for the REAL stuff!

Also, if you have small baking dishes, serve up individual macaroni and cheese meals.  I think they're adorable!


Ingredients
Serves 12

8 tablespoons (1 stick) unsalted butter (you'll use 2 T. for the bread and then 6 T. for the cheese sauce)
6 slices {good} white bread, crusts removed, torn into 1/4-1/2 inch pieces

5 1/2 cups milk
1/2 cup all-purpose flour
2 teaspoons salt
1/4 teaspoon ground nutmeg
1/4 teaspoon ground black pepper
1/4 teaspoon cayenne pepper, optional (I usually leave it out because some of our kids don't like spicy)
4 1/2 cups grated sharp white cheddar cheese
2 cups grated Gruyere cheese or 1 1/4 cups grated Pecorino Romano cheese

1 pound elbow macaroni, or a similar shaped noodle

Directions

1.  Heat oven to 375 degrees.  Butter or spray a 3-quart casserole dish; set aside.  Place small bread pieces in a medium bowl.  Melt 2 tablespoons butter in microwave safe dish.  Pour over bread and toss.  Set aside.

2.  In a medium saucepan set over medium heat, heat milk.  Melt remaining 6 tablespoons butter in large pot.  When butter bubbles, add flour.  Whisk one minute.

3.  While whisking, SLOWLY pour in hot milk.  Don't pour all milk in at one time or you'll have lumpy cheesy sauce.  Not good!  Continue cooking, until mixture bubbles and thickens.  This can take a few minutes.  Be patient.

4.  Remove pan from heat.  Stir in seasonings, 3 cups of the cheddar cheese, and 1 1/2 cups of the Gruyere.  Set aside.

5.  Meanwhile, prepare noodles according to package.  Drain, rinse with cold water.  Drain well.  Stir macaroni into cheese sauce.

6.  Pour mixture into prepared 3-quart dish, or small greased individual baking dishes.  Sprinkle with remaining cheese and breadcrumbs.  Bake until browned on top, 20  minutes or so.  Allow to cool 5 minutes before serving.


Sunday, December 11, 2011

Dangerously Tasty Peanut Butter Brownie Trifle


There are some desserts that are not only pretty to look at, but they bring out expressions like "OH MY WORD!"  They are great for a crowd, but dangerous for an individual or even a small family.  Each bite feels like my my jeans are getting tighter and I'll be paying with intense workouts in the coming week. I immensely enjoyed a couple bites and called it good.

This recipe is from How Sweet It Is.  I just recently found this blog on Pinterest. Perusing the fantastic ideas on Pinterest sometimes makes me feel like an underachiever with a poorly designed blog and no fashion sense, so I don't go there all too often.  Occasionally, I'll wind down in bed looking at beautiful decor, food, and clothing combos, but one can get quickly overwhelmed by great ideas.

Last night we hosted the dessert portion of a church middle school progressive dinner.  It was the perfect opportunity to try out this dessert.  Needless to say, with a houseful of teenagers and their leaders, it went quick!

The Trifle.  A whole lot of goodness thrown together in a pretty bowl.  Delicious!

Peanut Butter Brownie Trifle
The Layers:
Brownies
1 batch of boxed brownies made in a 9X13 pan, cooled and cut into small cubes


Chocolate Pudding
1 large box (5-ounce) instant chocolate pudding, prepared and chilled

Peanut Butter Cups
1 bag peanut butter cups, chopped (I opted to not top the trifle with them also.  Too many calories already)


Whipped Cream
2 cups heavy cream plus 3-4 granulated sugar, beat into whipped cream with stiff high peaks.
Make whipped cream and chill in refrigerator until ready to use.

Peanut Butter Filling
1 cup creamy peanut butter
8 ounces cream cheese, at room temperature.
1 cup powdered sugar
2 tablespoons milk

Beat peanut butter and cream cheese until creamy.  Add powdered sugar.  Mix.  Add 2 tablespoons of milk. Fold in 1 cup of the whipped cream from above.  Set aside.


Layering
Layer ingredients in the trifle dish.  Layer brownies, peanut butter filling, peanut butter cups, chocolate filling, then whipped cream.  I did each in thirds, finishing the top with whipped cream and then grated dark chocolate.


Dessert is probably the most important stage of the meal, since it will be the last thing your guests remember before they pass out all over the table.

Easy Advent Calendar

With just a click here or there on the internet, we are introduced to so many fabulous ideas to inspire creativity from sites like Pinterest and other random crafty blogs.  This year, with the help of my GREAT 8-year-old, behind-the-scenes motivator, I wanted to make an easy, yet attractive advent calendar we could use for years. My girlie wrote a count-down-to-Christmas list.  Just about every day in December had an activity assigned to it.  We just needed a great way to display her ideas.


I found the following idea from Simple Mom.  We made some changes and created our own variation of the advent calendar.


Begin with an empty frame.  We happened to have one just stashed away awaiting a good use.  It already matched our decor.

Attach ribbon to the back.  At first I tried a glue dot, but it wasn't heavy enough to hold the tags.  I then tried tape.  Fail.  Lastly I pulled out the big guns and used Gorilla Glue.  The ribbons are now secure.

Our ribbons were about 2.5" apart
I found K & Company Brenda Walton specialty paper at JoAnne's.  In the paper pad it had a couple sheets that had numbers 1-25 on it plus some other holiday/Christmas designs.

I purchased paper tags measuring approximately 5.25" X 2.5" and placed a number and the activity on each tag.  Next, position the tags.  We used two colors; white and manila tags.  It wasn't part of the original plan, but as crafts go, the craft store only had one tag pack left of each.  Turns out, I like the look.  We added a couple more events in between the numbered dates.We then clipped them to the ribbon using red metal binder clips found at Staples.


Positioning the tags
Each year we can adjust the activities as desired.  It's a fun project, that was quick to complete and adds Christmas cheer to our living room.


Saturday, December 10, 2011

A Great Cleaning Idea Embarrasses

Finding a GREAT idea and keeping it on your desktop for future reference is a handy way to grab it when you're ready to use it.  I've found fabulous ideas on Pinterest that I can't wait to try!

But sometimes these ideas are great for moms who do laundry, but not so great to display to strangers I don't know.

Yesterday I went to my first "find out how to use your computer" session and "Ralph" asked me to turn on the computer to get started.  The next thing that happened was "the page" popped up.

Now, to many of you, this would have been no big deal.  I know it would be no big deal to my mom or my husband, but it was completely embarrassing to me.

Another moment of realness on the blog-o-sphere.

HI, my name is Kimberly and I'm perpetually embarrassed.  Normal  everyday life occurrences embarrass me.  I can't even begin to mention the ways humiliation enters everyday life;  it's probably on a stratospheric scale.  Even when I tell myself, "It's no big deal."  I get embarrassed- like sweaty, heart-pumping embarrassment.

I really believe most of life's little imperfections are rooted in a few big categories of human frailty.

Embarrassment= Insecurity

Insecurity permeates many facets of everyday life.  It's really annoying and I wish I could just shrug it off with a laissez-faire attitude, but I don't roll that way. Bummer!

My hub and I were watching "Selling L.A." the other night and I was watching the L.A. Chic gals thinking how stylish and sophisticated they were.  Their inner geek didn't spring out unexpectedly like mine does so often.  Even in a moment of trying to pull off having it together, something will appeal to my wacky sense of humor, laughter will ensue and perhaps a snort will escape.  A total give-away that I'm a goofy girlie!

Back to Ralph.  I was trying to play it cool and act like no big deal that a page entitled "Goodbye to Yellow Armpit Stains" just popped up on my computer. Embarrassing!  I'm sure he wanted to know too, but wanted to be professional.  It's not like it's a big deal to most people, but normal bodily function stuff happens to embarrass me.  C'est la vie!

So, in my attempt to face my insecurities head on, I'm going to post this page.  I think it's great information for a cleaning lady like myself and I'm hoping it will help with the stains on my boys' baseball pants too.

Thank you Jillie for posting this entry.  Sensitive cleaning mommas need to know.

http://www.onegoodthingbyjillee.com/2011/11/goodbye-to-yellow-armpit-stains.html

Tuesday, December 06, 2011

And the Moral of the Story is....

As a worrying parent I can't even tell you how many times I've offered gentle reminders to our kids:

Where's your helmet?

Slow down.

Is your seatbelt on?

Don't throw balls in the house.

Ride on the sidewalk.

Don't dart out in front of cars.

Don't dive in the shallow pool.

Don't stand on basketballs, or soccerballs.

My oldest just reminded me of the one I told him yesterday, "Whatever you're thinking...DON'T DO IT!"

I hate to sound like a broken record, but it pains me terribly when they get hurt.

Today, after our homeschool classes,  our middle boy went out to play basketball with some buddies.  I was tidying up my classroom and chatting with a fellow homeschool mom who happens to also be a doctor.  Unexpectedly, one of our son's friends came up to the classroom and said our son was hurt and needed me.

We rushed downstairs and there I found my sweetheart in tears with a gash in his knee and blood running down his leg.  I had my friend take a look at it; she gave me the "stitches" nod.

We then rushed to the local urgent care which was packed.  Jumping back in the car, we headed to the next urgent care.

After a short wait we were seen.

"How did this happen?" asked the nurse.

The Gash


"I was standing on a basketball and fell off," said our son.

Soon, thereafter, the doctor came in.  She took one look at it and made the necessary preparations to stitch it up.

Sitting beside my sweetheart, wiping the tears rolling down his face as the doctor gave him numbing injections made me wish I could protect him from all pain. There's nothing I could do but pray with him and wait for her to sew him back up.

All stitched up

As a mom I try my best to prepare, instruct and equip our kids for whatever they may encounter.  Sometimes there are some lessons they have to learn at the school of hard knocks.

In the car on the way to the clinic, our son said to me, "This is a life lesson learned."

So true.

Hopefully he won't stand on a ball anytime soon.


And the moral of the story is... Don't stand on basketballs.  And, sometimes it pays to listen to your momma.

Monday, December 05, 2011

Gingerbread Cookies, The Ambulance, & The Unexpected Field Trip

Every year we make the same gingerbread recipe.  Thank you Martha!


And every year when we make these yummy Christmas treats, I think of one of the scariest experiences I've had as a momma.

December 2004, I was home alone with the kids.  My hub was working nights.  The kids and I were gathered in the kitchen mixing up a batch of Melissa's Gingerbread Cookies from The Martha Stewart Cookbook.  The kids were sitting on the counter helping add ingredients to the mixer.  I was standing right next to them.

Unexpectedly, our 1 1/2 year old girlie spun around and then fell backwards off the counter and hit her head on the hardwood floor.  It all happened so quickly AND I was right there.  How it happened still boggles my mind.  Immediately after she fell, I scooped her up. She was unconscious, back arched.  Quickly, I called 911 and within 7 minutes two sets of responders descended upon our home.  The boys and I were so frightened.  My girlie was conscious again, but lethargic.

After examination, the paramedics decided to transport us to the hospital for further evaluation.

In the ambulance the boys told the paramedic we were homeschoolers.  She proceeded to give them a field trip of the inside of the ambulance.  Meanwhile I held my precious girlie.  While at home, I was strong and clear thinking, but during the transport, the enormity of the whole event began to hit me.  Suddenly, I sensed a panic attack coming on.  The paramedic then placed an oxygen mask over my face for the remainder of the ride.  Breathe...

The kids still laugh over their momma's reaction.  They tell the story of the time nothing was wrong with their momma, but the paramedic had to give her oxygen.

Weak!

Our girlie ended up having a concussion.  Thankfully, nothing else was wrong.  She has a good story to go along with one of our family favorite cookies.

This year she drafted up a Christmas Advent list.  Making Gingerbread Cookies was our activity for December 1st.

She has a long list of fun activities for us in the month of December.  I'm making an easy advent calendar to showcase her ideas.

Here's a sneak peek at the Advent Calendar:


It's going to be a GREAT month!

Making Gingerbread Cookies With the Kids


What a cute Gingerbread Man!


Our favorite gingerbread cookie recipe.  When baking this cookie recipe with the kids, I do the step with the double boiler.  It is more of the tedious task.  This cookie dough is also dangerously good!  Watch out!

Melissa's Gingerbread Cookies
from The Martha Stewart Cookbook
makes 3-4 dozen cookies

1 cup dark molasses
1/2 cup packed light brown sugar
1/2 cup granulated sugar
4 teaspoons ground ginger
4 teaspoons ground cinnamon
3/4 tablespoon baking soda
1/2 pound (2sticks) unsalted butter, at room temperature
2 eggs, lightly beaten
6 cups sifted all-purpose flour

Royal icing

Place the molasses, sugars, ginger, and cinnamon in a double boiler over medium heat.  When the sugar has melted, add the baking soda and stir.  When the mixture bubbles up, remove from heat.

Place the butter in a large mixing bowl.  Add the hot molasses mixture and stir well. Let mixture cool to about 90 degrees F, then add the eggs.  Gradually add the flour, 1 cup at a time, while beating.  (This is best done in an electric mixer, but you can use a wooden spoon).

Preheat the oven to 325 degrees.  Line baking sheets with parchment paper.

Shape the dough into a neat rectangle, place on a well-floured board, and roll out until 1/4 inch thick.  Cut into shapes with a cookie cutter.  Place on baking sheet and bake 12-18 minutes, or until firm to the touch.  Let cool on racks.

Decorate with Royal Icing.

Step one in the double boiler.  Stir until sugar has melted.

After the soda is added...bubbly


Ready to roll

Oven ready


Icing is the kids job...my hub decorates with them


Friday, December 02, 2011

A Winner in the Family!


A few weeks ago, my girlie's soccer team mom mentioned AYSO Soccer was teaming up with Disney for a team spirit contest.  She asked if anyone on the team would be interested in writing a 100 word or less essay showcasing how our team demonstrated team spirit and sportsmanship.  Our girlie jumped at the opportunity and was so excited to write the essay.

The deadline for submission was November 18th.  The winner would be announced December 2nd.

This morning my girl came bouncing downstairs with her hands covering her face with excitement.  She said, "Mom, today's the BIG day!"

What big day?  December 2nd?  I had forgotten about the contest.

She hadn't.

She remembers everything!

I didn't want to tell her the odds of her winning was probably pretty slim.  I sure hope I'm not a pessimist, but really, what are the odds?

Tonight as I was waiting for her to finish gymnastics, I received this email.


Hello Kimberly! My name is __ from the AYSO National Office. Thanks so much for entering the AYSO/Disney-Pixar Cars 2 Team Sportsmanship Contest. We’re so excited to inform you that your wonderful submission has won you and team _____ (U-10) the Cars 2 Team Party! Congratulations! Please contact me on Monday so we can follow up with you on the details of your prize. Great job and again, congratulations!
I CAN'T BELIEVE IT!!   I'm so proud of our girlie!

She's optimistic!  She's full of HOPE!  She's a WINNER!

According to the submission form the winning team will receive:

Cars 2 themed dinner, plus each player will be presented with a "great sportsmanship" trophy and their own copy of the Cars 2 Blu-ray™ combo pack. 
Very exciting news at our house tonight!  Look like a celebration is in order.

Homeschool Resource Periodic Table


Our oldest son is studying Physical Science this year.  We've recently begun learning about atoms, molecules and chemical formulas.  As mentioned earlier, teaching science is not one of my strengths.  We just did an experiment the other day on water as a solvent.  If you need a visual, science and I are more like water and oil. We don't mix, but sometimes we can go well together and make a GREAT dressing! I blend up what I learn, pour it on our kids and they seem to thrive and understand. Moreover, I'm so grateful for a well-written, easily understood science curriculum- Apologia.  I'm also grateful when I stumble across a science resource that is informative and interesting.  I hope the kids like this one!

Before I share a Periodic Table find, I have to share a funny story.  A couple weeks ago my hub happened to be home from work for the morning.  The kids and I were reading about chemical formulas and elements on the Periodic Table.  We were discussing protons, neutrons and electrons.  After about 15 minutes, my oh-so-awesome, stylish, spiky hair, absolutely adorable hub (who happens to have a degree in Chemistry) enthusiastically walks in the room and shares some brain-a-licious Periodic Table information with us.  To be honest, we weren't completely grasping what he was sharing.  He then quietly left and went back to his work.

Our brown-eyed middle son, with the cutest look on his face then affectionately whispers, "He's such a little nerd."

We all laughed, not to be mean, but we all recognize underneath the stylish, athletic exterior lies a GREAT mind of a brainiac.  I used to tell my sweetheart, while we were in college, he's the cutest nerd to ever walk the chemistry halls.  Love that!

Anyway, back to the Periodic Table find.  Thanks to The Homeschool Resource of the Day from Homeschool Freebie of the Day we found three GREAT Periodic Table Resources.

Dynamic Periodic Table:  It's a Wikipedia resource.  Click on the element and learn all about it.
The link: http://ptable.com/

The Periodic Table of Videos:  I like this one because there are short, 4-5-minute videos displaying the element and showing the properties of it.  Very interesting!
The link: http://www.periodicvideos.com/index.htm

The Comic Book Periodic Table: This might be a popular find among the comic book fans.  It doesn't necessarily tell you much about the element, but does give an example where and when the comic mentioned the element.  This makes for fun trivia to add to a chemist's knowledge.
The link: http://www.uky.edu/Projects/Chemcomics/

The Photographic Periodic Table:  This resource has photos of the element and informative tidbits of information about the element.
The link: http://www.periodictable.com/

If you haven't yet checked out Homeschool Freebie of the Day, it is worth your while.  There are great downloads and resources.

Thursday, December 01, 2011

Book Study: Number The Stars Week 4

Teaching the history and overwhelming magnitude of World War II and The Holocaust to 5th-9th grade students can be a daunting task.  I REALLY want them to experience what we're reading and not just take the information and answer questions.  Reality is, we cannot even begin to grasp the enormity of it, but we can do our best to learn about the era, those involved, the events and the heroes who risked lives for others.

Sadly, too often students hear dates, statistics and facts and it's in one ear out the other.  I know first hand this type of learning.  Along with elementary education, I majored in history in college.  I learned a lot, regurgitated it for a test, and then went onto the next course.  I really can't say I had a professor who made an impact on my learning or that I fell in love with learning in college.  This is sad.  I imagine it's the same for many students.

Working with our kids has taught me to LOVE learning.  I LOVE thinking about being a pioneer girl on the open plain.  I love wondering if I'd have what it would take to help with the Underground Railroad.  Would I have the courage of Harriet Tubman or Corrie Ten Boom?  I've walked trails in our home state imagining I was Christy heading up through the Appalachian Mountains to teach.  Even tonight as I was completing a grueling workout running 400 meters, in the dark, carrying a 35 pound weight, I was imagining I was running from the Nazis carrying one of my children. Perhaps, I've been reading a little too much about World War II.

I'm currently teaching a book study on Number the Stars by Lois Lowry.  When planning to teach on the Holocaust, I found the National Holocaust Museum a GREAT resource.  They have informative guidelines for educators.  The guidelines point out that it's important to discuss the four types of groups involved: victims, perpetrators, rescuers, and bystanders.  We've discussed "The Final Solution" and that 6 million Jews were killed, but I had a sense the enormity of six million wasn't being translated into people.  One activity we did this week was to try to provide a visual representation for six million.

Forgive me if rice seems trivial, but I thought it would represent the magnitude and enormity of the number.

I brought a two pound bag of rice to class.

I divided our small class into three groups.  I asked each group to count the grains of rice I measured out to them.  I gave one group one cup of rice.  The two other groups received one teaspoon of rice.  The one cup of rice proved to be too much to count manually so we did our own calculations.  The two groups who had one teaspoon of rice counted out about 250 grains for their one teaspoon of rice.

There are 48 teaspoons in one cup, so we multiplied 48 X 250 equaling 12,000.

There were 5 cups of rice in the two pound bag.  This calculates to about 60,000 grains of rice in the 2 pound bag!

In order to count to six million, the students would need how many two-pound bags of rice?  ONE HUNDRED!!

With each grain of rice counted I tried to visualize each one as a person.  This is beyond comprehension!  Unfathomable!

I hope the lesson made an impact for the students.  It hit my heart...HARD!

Monday, November 28, 2011

Where to begin...

My brain is swirling with too many thoughts and ideas for posts.  My camera is filled with food photos of recipes to share, but there's just not enough time in the day.

This blog is primarily a journal so I can pass down family history, stories, ideas, recipes, and examples of God's goodness witnessed.  I don't want to ever take anything for granted and hope to teach our kids that God is GOOD ALL THE TIME!

Yesterday I was feeling down, in despair, and destitute- actually quite pitiful.  The word that came to mind was RAW.  I know on the blog, and in life, I may seem upbeat and cheery, but there are times when I feel like the scales are tipping to the side of uncertainty, "What do we do now?"  It's at these moments when I realize I'm not in control. God has a plan.  He's making me and molding me into the person He desires me to be.  Reliant on Him, rather than reliant on self.

This has been a tough year on us.  Like many Americans, we've been hit pretty hard with the economic downturn.  Living on one income is difficult.  Unexpected expenses can really rock the financial boat.  We've had a number of unexpected expenses arise.  I feel like we've had a financial earthquake and the aftershocks keep rolling in.  I wonder when it will end, but I'm afraid to even ask.

Through all of this God continues to teach us lessons.

The Stuff Doesn't Matter

In 2007, my hub was offered a job position in Southern California.  We had a comfortable life in the Pacific Northwest.  We had a lot of friends, a GREAT church, a wonderful community, newly built custom home, a view of majestic mountains, everything we could dream of.  I remember walking our property talking with God.  I didn't want to move.  I loved all we had.  I loved the comfort and security.  I sensed Him asking me, "Do you love this house, more than you love what I have in store for you?  Do you love this property more than the plans I have for you?  Do you love that view more than what awaits?"

These are tough questions!

At that time He gave me the following verses:

Genesis 12:1
"Leave your country, your people and your father's household and go to the land I will show you."
Hebrews 12:1  
"Therefore, since we are surrounded by such a great cloud of witnesses, let us throw off everything that hinders and the sin that so easily entangles. And let us run with perseverance the race marked out for us,"

I like how The Message rephrases it too:

Hebrews 12:1-3
Discipline in a Long-Distance Race
"Do you see what this means—all these pioneers who blazed the way, all these veterans cheering us on? It means we'd better get on with it. Strip down, start running—and never quit! No extra spiritual fat, no parasitic sins. Keep your eyes on Jesus, who both began and finished this race we're in. Study how he did it. Because he never lost sight of where he was headed—that exhilarating finish in and with God—he could put up with anything along the way: Cross, shame, whatever. And now he's there, in the place of honor, right alongside God. When you find yourselves flagging in your faith, go over that story again, item by item, that long litany of hostility he plowed through. That will shoot adrenaline into your souls!"
I knew God was asking me to jump out of the comfort zone and head to a new land with new adventures in store.  He was dealing with my heart and my stuff.  I took to heart, "throw off anything that hinders."  I had a lot of sentimental stuff hindering me from moving.  We began to move things out, but that was only the beginning.

Even after paring down, we moved to SoCal with A LOT!  I really felt for our poor movers.  Over the last couple years we've thrown off probably thousands of pounds of hindrances, but there's still more to be done. I'm giving away and selling so much.  It's freeing!  And I've realized so much of it just doesn't matter temporarily or eternally.  It's cluttering up our house, my heart, and our family freedom.

God, Where Are You?

Over the last six months or so, I feel like I've been in a boxing match getting knocked into the rings, finding strength to get up only to get hit again. God's blessed us with amazing resilience, but it gets exhausting.  I can't tell you how many times I've had "Job" moments.  Now there's a man who went THROUGH it!!

Over the last few months we've lost friends to illness, our cat died, we've had financial strains, broken bones, dental issues, and we're looking at being transferred once again.  We're living in a state of uncertainty.  I've noticed anxiety creeping into life again.  Living in the moment has gone out the window while my mind is preoccupied with worries about how this is all going to work out.  Since I'm such a control-freak, I'm so quick to try to grab the reins from God thinking He has NO IDEA where we're going.  I'm just like the Israelites during the Exodus.  You'd think I'd learn something along the way, but apparently I haven't grasped the concept yet!

I'm reading Beth Moore's Breaking Free right now.  Could there be a more perfect book, besides the Bible, for me to read?  I'd quote the whole book because it's that good, but that would make for one HUGE blog, so I'll keep it short.

"God surpasses our dreams when we reach past our personal plans and agendas to grab the hand of Christ and walk the path He has chosen for us."

"His Word, 'is a lamp to my feet.' meaning a guide for the steps I'm taking right now.  His Word is also 'a light for my path,' meaning a guide for my immediate future.  God's Word sheds light on our 'present' path and our immediate future so we'll know what steps to take, but for further instruction we'll have to walk today and check again!"


God does know where we're going.  He hears the cries of uncertainty and reassures. He's been consistently revealing himself through His Word, other books, sermons, and my kids.

Listen to the Kids

I may not have mentioned it yet to day, but our kids are awesomeness!  They provide great perspective and wisdom continually.

Yesterday, when I had the look of a stressed out mom, our oldest son said to me, "Mom, this is just like Soul Surfer.  When Bethany lost her arm and thought she had lost it all, she went to Thailand.  God gave her perspective in her situation.  Mom, you just need to check your perspective."

Oh my word!  Was that my precious child who just spoke these amazing words? Love Him!  The wisdom of youth is priceless!

I had lost perspective.  He guided me back on the path.

Last Thoughts...

When the Israelites were full of doubt in their weakness Moses reassured them,

"Do not be afraid.  Stand firm and you will see the deliverance the Lord will bring you today.  The Egyptians you see today you will never see again.  The Lord will fight for you;  you need only to be still."  Exodus 14:13-14

So, I will be still, or as The Message reads, "keep your mouth shut!"  God has a plan. He is the potter, I am the clay.  Sometimes this molding process can just be a bit uncomfortable.

Saturday, November 26, 2011

Harvest Margaritas


The day before Thanksgiving I was cooking away and watching Food Network's Thanksgiving Live.  The show featured recipes and tips from Rachael Ray, Anne Burrell, Sunny Anderson, Melissa d'Arabian and Bobby Flay.  I was so inspired watching these professional chefs.  What a GREAT life they seem to have!


One recipe idea that sounded good also happened to be completely out of character for me.  It was a cocktail idea.  The cocktail conversation kept coming up on the program.  Maybe they were trying to sell cocktails.  Well, they succeeded!


Bobby Flay presented his recipe for Harvest Margaritas.  About 10 or so years ago I bought some Tequila for some event.  We still have it.  Does alcohol ever go bad? Hmmm....good question.  Anyway, we just keep moving it from house to house and it sits up in the cupboard waiting for a good idea.


I looked up his recipe online and headed to the store for the ingredients we didn't have.  Bitters.  What the heck is bitters?  After arriving at the grocery and wandering down the alcohol aisle I read just about EVERY label and did not see something that read "Bitters."  I then sought the expertise of the internet. Apparently bitters used to be added to most drinks.  Interesting, but what is it?  I never found it, so I would have to improvise.  I used a couple splashes of Triple Sec instead.


Another item the store was out of was whole allspice.  Must have been a run on whole allspice for the fall holidays.  Again, improvisation was necessary.  I would leave it out.


Here's Bobby's real recipe:


Bobby Flay's Harvest Margaritas (Almost)


Ingredients

  • 2 ounces tequila, such as Patron reposado tequila (I used whatever was in the cupboard)
  • 1 1/2 ounces chilled Spiced Simple Syrup, recipe follows
  • 1/2 ounce freshly squeezed lime juice
  • Few dashes bitters (or Triple Sec like I used)
  • Ice
  • Lime wedge, for garnish
  • Kosher Salt

Directions

Combine the tequila, simple syrup, lime juice, bitters and ice in a cocktail shaker and shake for 10 seconds. Serve straight up or on the rocks with a lime wedge for garnish.

Spiced Simple Syrup:

  • 1 cup sugar
  • 8 whole allspice berries
  • 8 whole cloves
  • cinnamon sticks
  • 1-inch piece fresh ginger, peeled and coarsely chopped
Combine the sugar, 1 cup water, allspice, cloves, cinnamon and ginger in a small saucepan. Bring to a boil and cook until the sugar is completely melted. Remove from the heat and let steep for 1 hour. Strain into a small bowl, cover and refrigerate until cold.


How did it turn out?


We were graciously invited to enjoy Thanksgiving with some friends.  Ahead of time, I made the simple syrup.  I brought my Harvest Margarita ingredients to share and get some professional opinions.  They margaritas were a HIT!  They are super strong, so each couple just shared one.  We must be a bunch of lightweights.  It was fun to try something new.


I will keep them in mind for the future.


Thanks Bobby, for the great idea.  Maybe next time I'll need to find out what in the world bitters are.


Friday, November 25, 2011

Where there's a will, there's a way!

Black Friday 2011 was a big day in our family!  It's a 2-post kind of day.  First, the happenings for the littlest member of our family.

I'll begin with a little history.  Two of our littles were pacifier binky boys.  We attached those little plugs to their shirts and they loved them for a couple years. The binkies  were great soothers and took care of whatever ailed a little peewee. Around the age of 2-3 they either accidentally spit them down the flushing toilet (oops, bye-bye binkie) or sucked them to the point of destruction.  Before we knew it, they were done with the pacifier.

This was not the case with our little princess.  She was blessed with two favorite fingers that soothed her endlessly.  There was no chance these precious little appendages would actually get flushed down the commode.  Within the last year we've gently encouraged her not to plug her mouth with her favorite fingers especially during the day.  The more she felt stressed about quitting, the more she sucked!  The skin on her pale little fingers was consistently shriveled like she'd been in a pool for days and we noticed they were looking a bit more crooked than the others having been held at an angle for years.

She really needed to quit, but I didn't want to stress her about it.  It would come in her time.  We're not big on bargaining with our kids.  She either would quit on her own, or not.

To be honest, I cherished her little finger sucking.  She's the youngest and when I'd look at her with those fingers in her mouth she looked liked the little baby I once knew.  She wants the world to see her as an independent big girl.  I think she'd gotten to the point where she didn't want people to know, but it's just too hard to quit.

Within the last year or so she set her mind on getting her ears pierced.  She talked about it all the time.  She would save her money and buy rhinestone-looking scrapbook embellishments and stick them to her earlobes.  I told her when I was her age, I'd twist up aluminum foil and make hoop earrings and wear them like real earrings.

She asked constantly about getting her ears pierced.  Our response was, "When you stop sucking your fingers..."  We figured it wouldn't happen in quite awhile.

If you know our girlie, you know she's a girlie with a mind of her own.

She wanted her ears pierced...BAD!

At some point, late summer, she all of the sudden quit sucking her fingers!

We couldn't believe it!

There are probably times in her sleep when they creep back in, but during the day is basically non-existent.

She was so excited!

Her daddy told her, if she could make it 30 days, she could get her ears pierced. The countdown began.

But, it was soccer season.

She easily made it through the 30 days, but then had to wait until the end of soccer since the girls aren't allowed to wear any jewelry during the game.

Soccer finished last weekend so today was our first free day to make the trip to Claire's.


Her daddy filled out all the paperwork.  She picked out her birthstone earrings.  She was beaming!  She was so excited, but yet so nervous!  The two sales gals who were helping us had more hair color variations than I could count.  There was turquoise, red, pink, and maybe a little brown mixed in.  They had multiple piercings including ear discs, nose rings, and feathers hanging from the cartilage of the ear.  They were so patient and kind to us.

A little girl about 4-5 years old noticed my girlie in the chair, looking hesitant.  She told her daddy she wanted to come in to encourage our girlie.  She came in to say, "Be Brave."  How precious!

We took photos.  Then before it happened, she jumped out of the chair and said, "I'm not doing it.  Let's leave."

This is the "I'm pretty nervous" face.

Okay Mom, I'll smile for you!

With my dad beside me, I can do this.

Okay, I'm not sure about this again.

My stomach feels sick.  I'm ready to run!

I wasn't expecting that.

What to do now?

We talked about it and after a couple moments, she once again climbed back in the chair.

Back in, and ready to go.

Hair pinned back and the dots are marked where the earrings will soon be.

I love her!

Uh oh, the reality is sinking in again.


We opted for the double piercing so both piercings would happen at the same time.

It was SO fast I think my girlie was surprised.  Before she knew it, it was done.


Wow!  It's done, and she's smiling!

So proud of her new bling!


Her little lobes looked pretty red, but still as cute as ever.

Look at those little red lobes!
She looked in the mirror and the pride of facing her fears and seeing a dream come true was written all over  her little face.

A Big Girlie!
The rest of the day she's been flicking her hair around and displaying her shining bling.


What a girlie!

Love her!