Pages

Thursday, June 30, 2011

Rainbow Popsicles Summertime Treat

I found this idea on babble.com.


There seems to be a plethora of rainbow ideas available this summer.  Just search rainbow food and you'll find a host of new ideas.  One idea our daughter found and was so excited to make was Rainbow Popsicles. These can be a bit tedious in the making, but the result is fabulous! The littles in our home thoroughly enjoyed the process.  I would say the hardest part was the waiting time.  Between each layer there is 30 minute freezing time and then a final 3-hour freezing time. Three hours is a long time on a hot summer afternoon.


We used organic juices found at the market.  I bought a pomegranate juice, not the $6-$8 bottle of super antioxidant juice, just a pomegranate juice about $3 a bottle.  Also, if your concerned about food coloring, there are natural food coloring alternatives available at healthier food stores. 


Ingredients


1 cup sugar
1 cup water
2 tablespoons light corn syrup
2 cups pomegranate juice
3 cups lemonade
1 cup orange juice
food coloring
Dixie Cups (we just used Popsicle containers and cups we had around the house)
Popsicle sticks


In a medium saucepan, heat the sugar and water over medium heat. Bring to a boil, and stir until sugar has dissolved.  Remove from heat.  Stir in corn syrup.  Set aside to cool.


Prepare and chill the liquid layers.


Red: Combine 1 cup pomegranate juice, 2 tablespoons simple syrup, 2 drops red food coloring.


Orange:  Combine 1 cup orange juice, 2 tablespoons simple syrup, 1 drop red & 1 drop yellow food coloring.


Yellow:  Combine 1 cup lemonade, 2 tablespoons simple syrup, 1-2 drops yellow food coloring.


Green:  Combine 1 cup lemonade, 2 tablespoons simple syrup, 1-2 drops green food coloring.


Blue:  Combine 1 cup lemonade, 2 tablespoons simple syrup, 1-2 drops blue food coloring.


Purple:  Combine 1 cup pomegranate juice, 2 tablespoons simple syrup, 2 drops blue and 1 drop red food coloring.  We have a neon food coloring pack that has purple.  If you have that, then 2 drops purple.

Pour the red layer into your Dixie cups (or Popsicle containers), to about 1/4” thickness, and freeze for 30 minutes. Add the orange layer, in the same way, and freeze for another 30 minutes. Place the sticks in the center (the two layers should hold them pretty well), pour in the yellow layer, and freeze for another 30 minutes. Add the green, blue, and purple layers in the same fashion. The purple will come very close to the top of the cup, so handle carefully. Allow the Popsicles to freeze for 3 hours, though for optimal curing, let them freeze overnight.

We used juice glasses and IKEA Popsicle holders

Fresh from the freezer.  Just run warm water over the glass and the Popsicles loosen up easily.


Refreshing!

This is a BIG Popsicle!
There will be some simple syrup leftover–keep it in your fridge for future Popsicle, lemonade, or cocktail making.
To serve, simply make a small incision in the rim of the Dixie cup and tear the cup off.

Wednesday, June 29, 2011

Summertime Dress Up

Our kids used to love to dress up.  I kept bins of dress-up clothes available for their enjoyment.  After Halloween, I'd go to clearance sales to buy more costumes.  If they were into pirates, we'd buy small women's blazers and make them into pirate clothing.  We'd hunt down ruffled tops, scarves, funky glasses, and wigs.  We'd make capes for our superheroes.  If we were studying historical figures, we'd make costumes to dress up like them.  The kids loved it!  The dress up times were laughter filled.  It was exciting to see a new combo created and I especially loved seeing the kids faces as I'd marvel at their ingenuity.

Dress up days seem to be a thing of their past.  Occasionally the kids will get some costumes out and play around, but many of our get-ups have been sold or given away as the kids have outgrown them.  Here are a couple of our oldies.

A sequin cape adds pizzazz to any costume

Beautiful Long Hair makes doing dishes more fun!

A cowgirl

Super Boy!

Young Pirate Boy
Summertime and free time inspires kids to find fun things to occupy their time.  Although we have limited costumes, our daughter came up with some fun ones today!  I was completely entertained by her!


So if you have kids, have costumes!  It makes life better!!

Tuesday, June 28, 2011

Little House in the Big Woods- Ears Plugged, Humming La, La, La, La

Today we began reading Laura Ingalls' Little House in the Big Woods.  I read it to the kids many years ago, but I don't think they remember, so we're revisiting.  I guess because gathering food was survival it was a main topic of conversation.  I remember reading Farmer Boy to the kids years ago and just drooling over the pages and pages dedicated to popcorn.  The first chapter of this book was food focused!

Little House in the Big Woods starts out describing Pa hunting and gathering, the family enjoying fresh venison, Pa smoking the remaining venison, the family growing a garden, Laura reminiscing on the time Pa almost shot a bear, Pa's big fishing success, and the killing of the family hog.  The kids were fine with the smoking of the venison and the preparing of the fish.  They understand the need to put food up for the winter so as not to starve.  The didn't quite relish in the thought of Laura wishing her dad would have shot the bear because she loves the taste of bear.  But when the part of killing the hog came up, like Laura, our daughter covered her head, plugged her ears, and began humming so as not to hear the hog squeal.  Okay, she couldn't hear the hog squeal, but just reading about the killing of the hog was getting to her.

After Pa killed the hog, he blew up the bladder so Mary and Laura could play "ball" tossing it around like a balloon.  Our kids began to squirm.  The book goes on to describe the highlight of the hog killing.  Roasting the tail.  Yum!  Yum!  Pa took a stick and inserted it in the tail then the girls roasted it, listening to it crackle and drip.

All the time I'm reading our daughter was still humming under the blanket.

Guess we won't be having crispy hog tail anytime soon.  Funny how times change.

Tomorrow we'll go on to chapter two.  Will more food be on the agenda?

Monday, June 27, 2011

You Can't Help But Be Inspired- CrossFit Regionals

Last weekend we attended the Southern California CrossFit Regional Competition.  Since this was my first time attending any type of a CrossFit game, I wasn't sure what to expect.  I figured we'd see some amazingly strong people, but I had no idea what type of strength and endurance we'd witness.

Some of us were not as excited as others to be here.

The Regionals were a 3-day event with unbelievable, grueling workouts.  I've gathered it takes a special type of person to do 100 Pull-ups, 100 Kettlebell swings (53lb / 35lb), 100 Double-unders, 100 Overhead squats (95lb / 65lb) consecutively.  Even worse is having to do the work-out after one's palms are torn open from the pull-ups.  Perhaps even more incredible is watching a girl press 190 pounds over her head in a thruster and hold it!!  WOW!!  Watch her here:

http://www.youtube.com/watch?v=CveVZ4u38qo&feature=mfu_in_order&list=UL

The athletes at the Regional competition are nothing but amazing!  Their dedication to CrossFit, nutrition, and training is unique.  These elite athletes were determined, lean and fit!

Becca Voigt, Lindsey Valenzuela, and Katie Hogan
Here's a photo of the girls from Valley CrossFit website

While watching these competitors with friends, we were compiling wish lists for the physiques of our dreams.  The abs, shoulders, and backs we dream of having.  The weight we dream of being able to lift.  The wish we had that we would have taken better care of ourselves when younger, or had a desire to compete like this in our 20's.

I know CrossFit is not for everyone and not every gal likes the athletic build, but oh well.  I like it!  I like strength of body, mind and character.  I'm no longer the 20-something with dreams of doing this type of activity, but I'll continue to do what I can do. 

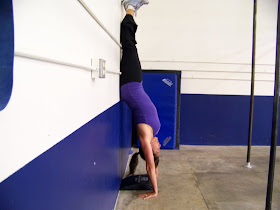
This past week I accomplished something new.  I did a handstand against a wall.  I'm sure I did them as a kid, but not as an adult.  Once I get more comfortable with my handstand, I'll try the handstand push-up.  Did I mention one of the workouts at the Regionals was 1000m run, 30 handstand push-ups and a 1000m row?  WOW!

Here I am finally getting into the handstand.

Here's Becca Voigt pumping out 30 handstand push-ups.  See that black cushion under her head.  She had to touch it with her head for each count.

I think I got a huge dose of inspiration.  It will be interesting to see how these gals do at the upcoming CrossFit Games.  Go Valley CrossFit!

Friday, June 24, 2011

Rooms That Inspire: A New Look At A Bookshelf

I have a Precious Friend.  We are both from the same state and same town.  We knew of each other back in that small town, but were not more than acquaintances.  Then God in His Goodness with a Perfect plan for both of our lives happened to relocate our two families to Southern California at the same time.  Since living here together we've developed such a great friendship.  I love how God works in that He had to move us over a thousand miles from our hometowns to have us meet and have our families grow in life together.

My sweet friend- Love Her! 

Celebrating my birthday with our preciouses.
Not only is my dear girlie beautiful, kind, generous, and loving she is a FANTASTIC decorator and has the cutest beachy bungalow she has decorated with great alley finds, repurposed items, and Anthropologie accents.  It just makes me feel good to be at her home.  I leave inspired to create something amazing! 

I was at her house today and took a couple pictures with my son's iPad.  Hopefully I'll be inspired to complete a couple summer projects!

Check out this favorite.  It's a new take on a bookshelf.  I think the iPad is only allowing me small photos at this time, but hopefully you can see.


I'll post more photos of favorite decorating ideas and hopefully you'll be able to see with better detail.  Until then.

Thursday, June 23, 2011

Roasted Curry Cauliflower

Roasted Curry Cauliflower

Roasted Curry Cauliflower is one of my favorite vegetable side dishes.  It's so quick and easy to make and the taste is scrumptious!  There are times when I make this and nearly eat the whole head of cauliflower by myself.  It make a good side dish or snack even.

Roasted Curry Cauliflower

Heat oven to 425 degrees

Ingredients:

1 head cauliflower (cleaned and broken into florets)
3 tablespoons extra virgin olive oil
1 teaspoon curry powder
1/2 - 1 teaspoon kosher salt

Place cauliflower florets in a large bowl.  Add the olive oil.  Sprinkle with curry powder and kosher salt.  Toss to coat.


Cauliflower sprinkled with olive oil, curry powder and kosher salt

Tossed and ready for oven


Place seasoned cauliflower on baking sheet.  Bake for approximately 20 minutes or until cauliflower is golden and a fork can easily be inserted.  Don't over bake as the cauliflower may get too soft and mushy.

So Good!  Enjoy!